3D Gaussian-Splatting 전체적인 흐름

SFM points → Initialization
: colmap을 이용해서 3D obj의 point cloud와 camera pose(intrinsic & extrinsic parameter)에 대한 정보를 얻은 후 3D gaussian의 초기값으로 사용한다.
Projection
: 3D gaussian을 Image plane에 투영해 2D gaussian 생성한다.
Differentiable Tile Rasterizer
: 하나의 이미지(1920x1080)를 부분 이미지(16x16)로 나누고, 부분 이미지에 포함된 여러 2D gaussian들을 depth에 따라 정렬한 후 부분 이미지마다 차례대로 투영해 하나의 2D image로 rendering한다.
→ ground truth image(Image)와 투영된 2D gaussian image(Projection)를 비교해가며 parameter 업데이트
Adaptive Density Control
: ground truth image(Image)와 투영된 2D gaussian image(Projection)간의 비교 후 발생한 gradient만큼 3D gaussian 형태 변화시킨다.
Differentiable 3D gaussian splatting
3D gaussian은 3x3 공분산과 point cloud의 position으로 정의된다.
3D gaussian = Σ(3x3 공분산) & 𝜇(point cloud의 position)
Σ(3x3 공분산, world coord)
: 3D 공간에서 3D gaussian의 중심(𝜇)으로부터 3D gaussian이 x, y, z축의 방향으로 어떻게 분포돼 있는지, 어떤 형태를 갖는지 표현한다.
Σ = RSSTRT = MMT(M = RS, R & S: 3x3)
: Σ는 scaling에 관한 vector s(3D gaussian이 x, y, z축으로 얼마나 큰 scale을 갖는지)와 rotation에 관한 vector quanternion(3D gaussian이 x, y, z축으로 어떤 방향을 향하고 있는지)으로 표현된다.
quanternion
: (w, x, y, z)로 구성되는 vector이며, w는 회전 각도이고 x, y, z는 회전 축에 해당된다. quanternion을 이용해서 아래와 같은 rotation matrix를 구성할 수 있다.
아래 코드는 3D 공분산 행렬을 구하는 c++ 코드이다.
//code path: C:\Users\user\gaussian-splatting\submodules\diff-gaussian-rasterization\cuda_rasterizer\forward.cu
__device__ void computeCov3D(const glm::vec3 scale, float mod, const glm::vec4 rot, float* cov3D)
{
	// Create scaling matrix
	glm::mat3 S = glm::mat3(1.0f);
	S[0][0] = mod * scale.x;
	S[1][1] = mod * scale.y;
	S[2][2] = mod * scale.z;

	// Normalize quaternion to get valid rotation
	glm::vec4 q = rot;// / glm::length(rot);
	float r = q.x;
	float x = q.y;
	float y = q.z;
	float z = q.w;

	// Compute rotation matrix from quaternion
	glm::mat3 R = glm::mat3(
		1.f - 2.f * (y * y + z * z), 2.f * (x * y - r * z), 2.f * (x * z + r * y),
		2.f * (x * y + r * z), 1.f - 2.f * (x * x + z * z), 2.f * (y * z - r * x),
		2.f * (x * z - r * y), 2.f * (y * z + r * x), 1.f - 2.f * (x * x + y * y)
	);

	glm::mat3 M = S * R; // M = 𝑆𝑅

	// Compute 3D world covariance matrix Sigma,
	glm::mat3 Sigma = glm::transpose(M) * M; // Σ = 𝑅𝑆𝑆𝑇𝑅𝑇

	// Covariance is symmetric, only store upper right
	cov3D[0] = Sigma[0][0];
	cov3D[1] = Sigma[0][1];
	cov3D[2] = Sigma[0][2];
	cov3D[3] = Sigma[1][1];
	cov3D[4] = Sigma[1][2];
	cov3D[5] = Sigma[2][2];
}
𝜇(point cloud의 position x, y, z)
: 3D gaussian의 중심을 나타내며, colmap에서 얻어진 point cloud의 position의 값이다.
아래 식에서 x는 3D gaussian을 구성하는 점들의 집합이고, 𝜇는 colmap에서 얻어지는 point cloud의 position으로 3D gaussian의 중심이며, Σ는 x, y, z축의 방향에 따른 3D gaussian의 분포 및 형태를 나타낸다.
3D gaussian to 2D gaussian
3D gaussian을 2D gaussian으로 투영할 때, 얻어지는 2D gaussian의 공분산 행렬(image coord)은 다음과 같다.
Σ'(3x3 공분산, image coord)
: 2D image에서 2D gaussian이 x, y축의 방향으로 어떻게 분포되는지 표현한 matrix라고 생각하면 된다.
Σ'는 3x3 형태지만, 2D image plane에서의 gaussian 분포(x, y축에서의 gaussian 분포)만 필요하기 때문에 마지막 행과 열은 삭제해도 된다.
아래 코드는 2D 공분산 행렬을 구하는 c++ 코드이다. (좌표계 관련 자료: https://learnopengl.com/Getting-started/Coordinate-Systems )
//copy path: C:\Users\user\gaussian-splatting\submodules\diff-gaussian-rasterization\cuda_rasterizer\forward.cu
// Forward version of 2D covariance matrix computation
__device__ float3 computeCov2D(const float3& mean, float focal_x, float focal_y, float tan_fovx, float tan_fovy, const float* cov3D, const float* viewmatrix)
{
	// The following models the steps outlined by equations 29
	// and 31 in "EWA Splatting" (Zwicker et al., 2002).
	// Additionally considers aspect / scaling of viewport.
	// Transposes used to account for row-/column-major conventions.
	float3 t = transformPoint4x3(mean, viewmatrix); // world space(world coord) --> view space(camera coord)

	const float limx = 1.3f * tan_fovx;
	const float limy = 1.3f * tan_fovy;
	const float txtz = t.x / t.z;
	const float tytz = t.y / t.z;
	t.x = min(limx, max(-limx, txtz)) * t.z;
	t.y = min(limy, max(-limy, tytz)) * t.z;

	glm::mat3 J = glm::mat3( // view space(camera coord) --> clip space(image coord)
		focal_x / t.z, 0.0f, -(focal_x * t.x) / (t.z * t.z),
		0.0f, focal_y / t.z, -(focal_y * t.y) / (t.z * t.z),
		0, 0, 0);

	glm::mat3 W = glm::mat3( // world space(world coord) --> view space(camera coord)
		viewmatrix[0], viewmatrix[4], viewmatrix[8],
		viewmatrix[1], viewmatrix[5], viewmatrix[9],
		viewmatrix[2], viewmatrix[6], viewmatrix[10]);

	glm::mat3 T = W * J;

	glm::mat3 Vrk = glm::mat3( // world space에서의 3D cov
		cov3D[0], cov3D[1], cov3D[2],
		cov3D[1], cov3D[3], cov3D[4],
		cov3D[2], cov3D[4], cov3D[5]);

	glm::mat3 cov = glm::transpose(T) * glm::transpose(Vrk) * T; // Σ' = JT * WT * ΣT * W * J, 2D image plane에서의 2D cov

	// Apply low-pass filter: every Gaussian should be at least
	// one pixel wide/high. Discard 3rd row and column.
	// Σ'는 3x3으로 결과가 나오지만, 첫 번째와 두 번째 행과 열에 대한 정보만 필요함
	cov[0][0] += 0.3f;
	cov[1][1] += 0.3f;
	return { float(cov[0][0]), float(cov[0][1]), float(cov[1][1]) };
}
J(3x3, 자코비안 matrix)
: camera coord(3D)로 표현한 3D gaussian의 공분산 matrix를 image coord(2D)으로 선형적(affine approximation)으로 투영 변환(projective transformation)하는 matrix이다.
W(3x3)
: world coord에서 camera coord으로 투영하는 matrix이다. 3D gaussian의 공분산(world coord, 3D)을 camera coord(3D)으로 투영하기 위해 사용되는 matrix이다.
추가적으로, W와 J를 Σ의 전후로 곱해주는 이유는 아래와 같은 증명 때문이다.
아래 그림처럼 기존 데이터 x의 공분산 matrix가 있을 때, 여기에 선형 변환 matrix A를 곱해주게 되면 데이터 Ax의 공분산 matrix가 결과로 나온다. 이때 식을 마지막까지 전개하면, Ax의 공분산 matrix는 결국 기존 x의 공분산 matrix에 A와 AT를 곱한 형태로 표현할 수 있다.

C(3D gaussian color)
: 3D gaussian의 RGB 값(3개)과 추가적인 색상 데이터(15개)를 포함한다. 특히, 각 3D gaussian마다 존재하는 색상 계수(구면에서의 색상 정보 포함)를 이용해 3D gaussian color를 업데이트 한다.
A(opacity)
: 3D gaussian의 opacity로 0~1 사이의 값으로 최적화 된다.
Optimization Gaussian Splatting
init covariance matrix
: 초기 3D 공분산 행렬은 isotropic 가우시안의 공분산 행렬을 따르기 때문에 모든 방향 x, y, z에서 같은 분포를 갖는 구형 형태의 3D gaussian 분포에서 시작한다.
Optimize 3D gaussian
: 3D gaussian M(point cloud position), Color(feature dc(RGB), feature rest), A(opacity), R & S(Covariance, rotation & scaling)를 최적화할 때 adam optimizer를 사용하며, 각 변수마다 lr는 모두 다르게 설정돼 있다.
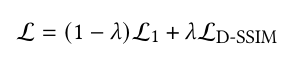
Loss function lambda
: Loss function을 구성하는 L1은 실제 2D 이미지와 투영된 2D gaussian으로 구성된 image간의 절대 오차이고, Ld-ssim은 실제 2D image와 3D gaussian을 2D image로 투영했을 때 두 이미지간의 구조적 유사성을 측정해 비교한 loss function이다. (𝜆 = 0.2)
Adaptive Gaussian Control
intial 3D gaussian으로부터 3D gaussian의 수와 밀도를 최적화하는 방법이 있는데, 크게 3D Gaussian split/clone/remove가 있다. 그리고 3D Gaussian의 split/clone/remove는 3D Gaussian이 Scene 안에서 gaussian의 분포가 불안정하거나 불완전하게 생성된 경우 수행된다.
3D Gaussian이 Scene 안에서 gaussian의 분포가 불안정하거나 불완전하게 생성된 경우는 아래와 같이 크게 두 경우가 존재한다.
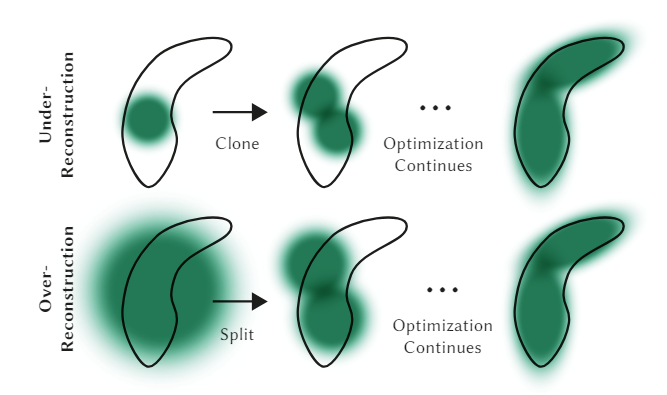
Under-reconstruction(num: one to two)
- 2D Gaussian의 position 변화율이 0.0002보다 크면서 3D Gaussian의 scale이 임계값보다 작거나 같은 경우
: 3D gaussian이 충분히 재구성되지 않은 경우로, 공분산이 작은(작은 크기의) 3D gaussian을 clone한다. 기존 3D gaussian과 동일한 position, color, opacity, covariance 값이 할당된 새로운(clone한) 3D gaussian을 배치한다. (clone된 3D gaussian의 A, C, S, R, M 초기값만 기존 3D gaussian과 동일)
    def densify_and_clone(self, grads, grad_threshold, scene_extent): # gaussian clone, (self.xyz_gradient_accum/self.denom, max_grad(0.0002), 3.367985773086548)
        # Extract points that satisfy the gradient condition
        #print("grads: ", grads, grads.shape)
        selected_pts_mask = torch.where(torch.norm(grads, dim=-1) >= grad_threshold, True, False) # 2D gaussian의 position 변화 정도가 0.0002보다 큰 gaussian만 선택
        selected_pts_mask = torch.logical_and(selected_pts_mask,
                                              torch.max(self.get_scaling, dim=1).values <= self.percent_dense*scene_extent) # 3D gaussian의 scaling 값이 self.percent_dense*scene_extent보다 작거나 같은 gaussian만 선택
        #print("selected_pts_mask: ", selected_pts_mask, selected_pts_mask.shape)

        new_xyz = self._xyz[selected_pts_mask]
        new_features_dc = self._features_dc[selected_pts_mask]
        new_features_rest = self._features_rest[selected_pts_mask]
        new_opacities = self._opacity[selected_pts_mask]
        new_scaling = self._scaling[selected_pts_mask]
        new_rotation = self._rotation[selected_pts_mask]

        self.densification_postfix(new_xyz, new_features_dc, new_features_rest, new_opacities, new_scaling, new_rotation)
        # clone한 새로운 gaussian에 self._xyz, self._features_dc, self._features_rest, self._opacity, self._scaling, self._rotation,
        # self.xyz_gradient_accum, self.denom, self.max_radii2D 할당
Over-reconstruction(num: one to two)
- 2D Gaussian의 position 변화율이 0.0002보다 크면서 3D Gaussian의 scale이 임계값보다 큰 경우
: 3D gaussian이 필요 이상으로 재구성된 경우로, 공분산이 큰(큰 크기의) 하나의 3D gaussian을 두 개로 split한다. 기존 3D gaussian의 scaling값을 std로한 정규분포 안에서 sampling한 position, 기존 3D gaussian보다 작은 scale, 기존 3D gaussian과 동일한 color, opacity, rotation 값이 할당된 새로운(split한) 3D gaussian을 2개 배치한다. (split된 3D gaussian의 A, C, R 초기값만 기존 3D gaussian과 동일)
    def densify_and_split(self, grads, grad_threshold, scene_extent, N=2): # gaussian split, (self.xyz_gradient_accum/self.denom, max_grad(0.0002), 3.367985773086548)
        n_init_points = self.get_xyz.shape[0]
        # Extract points that satisfy the gradient condition
        padded_grad = torch.zeros((n_init_points), device="cuda")
        padded_grad[:grads.shape[0]] = grads.squeeze()
        selected_pts_mask = torch.where(padded_grad >= grad_threshold, True, False) # 2D gaussian의 position 변화 정도가 0.0002보다 큰 gaussian만 선택
        selected_pts_mask = torch.logical_and(selected_pts_mask,
                                              torch.max(self.get_scaling, dim=1).values > self.percent_dense*scene_extent) # 3D gaussian의 scaling 값이 self.percent_dense*scene_extent보다 큰 gaussian만 선택

        # 기존의 큰 3D Gaussian이 두 개의 작은 gaussian로 분할됨(repeat(N,1)에 의해서)
        stds = self.get_scaling[selected_pts_mask].repeat(N,1) # split한 gaussian의 scale은 기존 gaussian의 scale로 초기화
        #print('stds: ', stds, stds.shape) - ex. (0.1, 0.2, 0.3)
        means =torch.zeros((stds.size(0), 3),device="cuda") # split한 gaussian의 position 0으로 초기화 - (0, 0, 0)
        samples = torch.normal(mean=means, std=stds) # 정규분포에서 3D Gaussian의 스케일링 값을 표준편차로 사용해, split한 gaussian의 새로운 위치를 샘플링
        #print('samples: ', samples, samples.shape) - ex. (mean: 0 / std: 0.1에서 sampling, mean: 0 / std: 0.2에서 sampling, mean: 0 / std: 0.3에서 sampling)
        rots = build_rotation(self._rotation[selected_pts_mask]).repeat(N,1,1)
        new_xyz = torch.bmm(rots, samples.unsqueeze(-1)).squeeze(-1) + self.get_xyz[selected_pts_mask].repeat(N, 1)
        #new_xyz = self.get_xyz[selected_pts_mask].repeat(N, 1) ###
        new_scaling = self.scaling_inverse_activation(self.get_scaling[selected_pts_mask].repeat(N,1) / (0.8*N))
        new_rotation = self._rotation[selected_pts_mask].repeat(N,1)
        new_features_dc = self._features_dc[selected_pts_mask].repeat(N,1,1)
        new_features_rest = self._features_rest[selected_pts_mask].repeat(N,1,1)
        new_opacity = self._opacity[selected_pts_mask].repeat(N,1)

        self.densification_postfix(new_xyz, new_features_dc, new_features_rest, new_opacity, new_scaling, new_rotation) # split된 3D gaussian
        # split한 새로운 gaussian에 self._xyz, self._features_dc, self._features_rest, self._opacity, self._scaling, self._rotation,
        # self.xyz_gradient_accum, self.denom, self.max_radii2D 할당

        # 기존의 큰 3D Gaussian은 제거
        prune_filter = torch.cat((selected_pts_mask, torch.zeros(N * selected_pts_mask.sum(), device="cuda", dtype=bool)))
        self.prune_points(prune_filter)
Remove(num: one to zero)
: 1. 3D gaussian의 opacity 값이 작거나, 2. 3D gaussian의 scale이 큰 경우, 3. 2D gaussian의 반경이 작은 경우들 중 하나에 포함되면 gaussian이 제거된다.
    def densify_and_prune(self, max_grad, min_opacity, extent, max_screen_size): # gaussian split, clone, remove
        # in: max_grad(0.0002: view-space positional gradient), min_opacity(0.005), extent(3.367985773086548: 중심으로부터 카메라간의 거리), max_screen_size(20)
        # self.xyz_gradient_accum: 2D gaussian position의 변화 정도를 나타냄
        # self.xyz_gradient_accum가 크면 2D gaussian position을 크게 업데이트 해야함
        # self.xyz_gradient_accum가 작으면 2D gaussian position이 이미 최적의 위치와 가까움을 의미
        grads = self.xyz_gradient_accum / self.denom # 현재까지 2D gaussian의 position 변화 정도의 평균(누적 x)(view-space positional gradient)
        grads[grads.isnan()] = 0.0
        #print('grads: ', grads, grads.shape)

        self.densify_and_clone(grads, max_grad, extent) # clone
        self.densify_and_split(grads, max_grad, extent) # split

        # 1. 3D gaussian의 opacity 값이 너무 작거나, 2. 2D gaussian의 반경이 너무 크거나, 3. 3D gaussian의 scale이 너무 클 경우 --> gaussian 제거
        prune_mask = (self.get_opacity < min_opacity).squeeze() # 1. 3D gs의 opacity가 0.005보다 작은 경우
        if max_screen_size:
            big_points_vs = self.max_radii2D > max_screen_size # 2. 2D gs의 최대 반경이 20보다 큰 경우
            big_points_ws = self.get_scaling.max(dim=1).values > 0.1 * extent # 3. 3D gs의 크기가 0.3보다 큰 경우
            prune_mask = torch.logical_or(torch.logical_or(prune_mask, big_points_vs), big_points_ws) # 1, 2, 3 중에 하나에 해당되더라도
        self.prune_points(prune_mask) # 3D와 2D에서의 gaussian 모두 삭제

        #<3D gaussian>
        # self._xyz: 3D gaussian position(80000, 3), self._features_dc, self._features_rest: 3D gaussian의 색상 정보(80000, 1, 3), (80000, 15, 3)
        # self._opacity: 3D gaussian opacity(80000, 1), self._scaling: 3D gaussian scaling 정보(80000, 3), self._rotation: 3D gaussian의 rotation 정보(80000, 3)

        #<2D gaussian>
        # self.xyz_gradient_accum: 2D gs position의 변화 정도 accum(80000, 1), self.denom: 매 iteration마다 포착된 gs count(80000, 1), self.max_radii2D: 2D gs의 최대 반경(80000)

        #print("self._xyz: ", self._xyz, self._xyz.shape, "self._features_dc: ", self._features_dc, self._features_dc.shape, "self._features_rest: ", self._features_rest, self._features_rest.shape, "self._opacity: ", self._opacity, self._opacity.shape, "self._scaling: ", self._scaling, self._scaling.shape, "self._rotation: ", self._rotation, self._rotation.shape)
        #print("self.xyz_gradient_accum: ", self.xyz_gradient_accum, self.xyz_gradient_accum.shape, "self.denom: ", self.denom, self.denom.shape, "self.max_radii2D: ", self.max_radii2D, self.max_radii2D.shape)

        torch.cuda.empty_cache()
Fast Differentiable Rasterizer For Gaussians
3D gaussian splatting에서 2D gaussian을 바탕으로 2D image를 rendering할 때 tile-based-rasterizer를 사용한다. tile-based-rasterizer는 하나의 이미지(1920x1080)를 부분 이미지(16x16)로 나눈 후, 부분 이미지에 포함되는 여러 2D gaussian을 depth에 따라 정렬하고나서 gaussian들을 하나의 2D image로 rendering하는 방식이다.
tile-based rasterize process
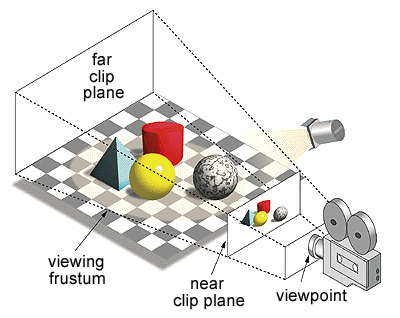
1. 시야 영역에 있는 2D gaussian만 추출한다.
(3D Gaussian culling: 2D image에 gaussian을 투영할 때, view frustum 바깥쪽에 있는 gaussian 제거)
2. 하나의 이미지(48 x 48)를 16x16의 tile로 분할한다.

3. 각 Gaussian을 겹치는 타일에 따라 3D gaussian을 인스턴스화(tile마다 겹치는 gaussian들을 복제)한다. 인스턴스화한 gaussian들을 gaussian의 depth에 따라 오름차순으로 모두 정렬(radix sort)한 후 각 타일마다 어떤 gaussian이 존재하는지 구분한다.
(각 3D gaussian 인스턴스마다 gaussian의 depth(하위 32 bit) & tile ID(상위 32 bit)가 결합된 key가 부여된다.)

4. 각 tile마다 tile 내 존재하는 gaussian들을 순회하며 해당 gaussian과 gaussian의 color와 opacity를 tile을 구성하는 pixel에 누적시킨다(= a-blending). 또한, a-blending 과정에서는 각 pixel들에 누적된 opacity가 0.9999가 되기 전에 pixel rendering을 종료한다.

아래는 rasterize에 해당하는 수도 코드이다. (실제 코드에서는 c++로 구현돼 있기 때문에 수도 코드로 대체한다.)

아래는 실제 3D gaussian splatting이 수행되는 python 코드이다.
def training(dataset, opt, pipe, testing_iterations, saving_iterations, checkpoint_iterations, checkpoint, debug_from):
    first_iter = 0
    tb_writer = prepare_output_and_logger(dataset) # tensorboard 작성

    gaussians = GaussianModel(dataset.sh_degree) # GaussianModel(ModelParams(parser)), M(position), S(covariance), A(opacity), C(color)
    print('GS_model: ', gaussians.setup_functions())
    # self.sh_degree = 3
    # lp = ModelParams(parser) <-- dataset
    # op = OptimizationParams(parser)
    # pp = PipelineParams(parser)
    # training(lp.extract(args), op.extract(args), pp.extract(args), args.test_iterations, args.save_iterations, args.checkpoint_iterations, args.start_checkpoint, args.debug_from)

    scene = Scene(dataset, gaussians) # Scene(ModelParams(parser), gaussians)
    gaussians.training_setup(opt)
    if checkpoint:
        (model_params, first_iter) = torch.load(checkpoint)
        gaussians.restore(model_params, opt)

    bg_color = [1, 1, 1] if dataset.white_background else [0, 0, 0] # background color: black 기본 설정
    background = torch.tensor(bg_color, dtype=torch.float32, device="cuda")

    iter_start = torch.cuda.Event(enable_timing = True)
    iter_end = torch.cuda.Event(enable_timing = True)

    viewpoint_stack = None
    ema_loss_for_log = 0.0
    progress_bar = tqdm(range(first_iter, opt.iterations), desc="Training progress")
    first_iter += 1
    for iteration in range(first_iter, opt.iterations + 1): # 0 ~ 30000
        if network_gui.conn == None:
            network_gui.try_connect()
        while network_gui.conn != None:
            try:
                net_image_bytes = None
                custom_cam, do_training, pipe.convert_SHs_python, pipe.compute_cov3D_python, keep_alive, scaling_modifer = network_gui.receive()
                if custom_cam != None:
                    net_image = render(custom_cam, gaussians, pipe, background, scaling_modifer)["render"]
                    '''
                    3D gaussian --> 2D gaussian render
                     {"render": rendered_image, # 3D --> 2D로 3D gaussian(시야 영역에 존재하는 3D GS) 투영
                     "viewspace_points": screenspace_points, # 2D gaussian position
                     "visibility_filter" : radii > 0, # 2D GS 반경이 0보다 커야함
                     "radii": radii} # 2D GS 반경
                    '''
                    net_image_bytes = memoryview((torch.clamp(net_image, min=0, max=1.0) * 255).byte().permute(1, 2, 0).contiguous().cpu().numpy())

                network_gui.send(net_image_bytes, dataset.source_path)
                if do_training and ((iteration < int(opt.iterations)) or not keep_alive):
                    break
            except Exception as e:
                network_gui.conn = None

        iter_start.record()

        gaussians.update_learning_rate(iteration) # 3D gaussian의 position(self._xyz) 최적화

        # Every 1000 its we increase the levels of SH up to a maximum degree
        if iteration % 1000 == 0: # 1000 iteration마다 SH 차수 증가
            gaussians.oneupSHdegree()

        # Pick a random Camera
        if not viewpoint_stack: # 만약 iteration동안 80 view를 모두 돌았다면, train camera를 가져와서 다시 80view 최적화
            viewpoint_stack = scene.getTrainCameras().copy()
        viewpoint_cam = viewpoint_stack.pop(randint(0, len(viewpoint_stack)-1))

        # Render: 3D GS --> 2D GS (Projection)
        if (iteration - 1) == debug_from: # pipe.debug = False
            pipe.debug = True

        bg = torch.rand((3), device="cuda") if opt.random_background else background

        # 2D gaussian & projected gaussian image render
        render_pkg = render(viewpoint_cam, gaussians, pipe, bg)
        image, viewspace_point_tensor, visibility_filter, radii = render_pkg["render"], render_pkg["viewspace_points"], render_pkg["visibility_filter"], render_pkg["radii"]
        # 3D에서 2D로 3D gaussian(시야 영역에 존재하는 3D GS)이 투영된 2D img(3, 900, 1600), 2D gs position, 2D gs 반경 범위, 2D GS 반경

        if iteration == 30000:
            dir = r'C:\Users\user\gaussian-splatting'
            file_path = os.path.join(dir, 'print_output.txt')

            with open(file_path, 'w') as file:

                torch.set_printoptions(threshold=np.inf)

                file.write("render_pkg iter 7000 ===================\n")
                file.write(str(render_pkg) + "\n")

        # Loss(2D gaussian을 투영항 image와 실제 ground truth image의 비교를 통해 3D gaussian 업데이트)
        gt_image = viewpoint_cam.original_image.cuda() # real 2D img - (3, 900, 1600)
        Ll1 = l1_loss(image, gt_image)
        loss = (1.0 - opt.lambda_dssim) * Ll1 + opt.lambda_dssim * (1.0 - ssim(image, gt_image)) # L = (1-0.2)*L1 + 0.2*L_D-SSIM
        loss.backward()
        # 변수(grad_means3D, grad_means2D, grad_sh, grad_colors_precomp, grad_opacities, grad_scales, grad_rotations, grad_cov3Ds_precomp)들의 gradient 계산

        iter_end.record()

        with torch.no_grad():
            # Progress bar
            ema_loss_for_log = 0.4 * loss.item() + 0.6 * ema_loss_for_log
            if iteration % 10 == 0:
                progress_bar.set_postfix({"Loss": f"{ema_loss_for_log:.{7}f}"})
                progress_bar.update(10)
            if iteration == opt.iterations:
                progress_bar.close()

            # Log and save
            training_report(tb_writer, iteration, Ll1, loss, l1_loss, iter_start.elapsed_time(iter_end), testing_iterations, scene, render, (pipe, background))
            if (iteration in saving_iterations):
                print("\n[ITER {}] Saving Gaussians".format(iteration))
                scene.save(iteration)

            # Densification
            if iteration < opt.densify_until_iter: # opt.densify_until_iter: densification 종료되는 iter(15000)
                # Keep track of max radii in image-space for pruning
                gaussians.max_radii2D[visibility_filter] = torch.max(gaussians.max_radii2D[visibility_filter], radii[visibility_filter])
                gaussians.add_densification_stats(viewspace_point_tensor, visibility_filter)

                if iteration > opt.densify_from_iter and iteration % opt.densification_interval == 0:
                    # iteration > 500(densification 시작되는 iter) & iteration % 100 == 0(densification (3D gaussian clone/split) 수행되는 간격)

                    size_threshold = 20 if iteration > opt.opacity_reset_interval else None # iteration > opt.opacity_reset_interval(3000)
                    gaussians.densify_and_prune(opt.densify_grad_threshold, 0.005, scene.cameras_extent, size_threshold) # gaussian split, clone, remove
                    # max_grad(0.0002, 2D gaussian의 position 변화 정도(누적 x)), min_opacity(0.005), extent(3.367985773086548: 중심으로부터 카메라간의 거리), max_screen_size(20, 3D gs의 크기 제한 조건)
                    # 여기서 3D gs의 clone/split/remove 수행
                    print('densification - ', 'img view: ', viewpoint_cam.uid)

                if iteration % opt.opacity_reset_interval == 0 or (dataset.white_background and iteration == opt.densify_from_iter):
                    # iteration % 3000 == 0(iteration이 3D gaussian의 opacity reset 수행 간격에 해당되거나)
                    # 흰 배경을 사용하면서 densification 시작되는 iter에서 opacity 초기화

                    gaussians.reset_opacity()
                    print('opacity reset - ', 'img view: ', viewpoint_cam.uid)

            # Optimizer step
            if iteration < opt.iterations:
                gaussians.optimizer.step()
                gaussians.optimizer.zero_grad(set_to_none = True)

            if (iteration in checkpoint_iterations):
                print('checkpoint_iteration')
                print("\n[ITER {}] Saving Checkpoint".format(iteration))
                torch.save((gaussians.capture(), iteration), scene.model_path + "/chkpnt" + str(iteration) + ".pth")
'글 & 논문 > Computer vision' 카테고리의 다른 글
| [Camera parameter] 3D to 2D projection (0) | 2024.05.23 |
|---|---|
| [PTAM] Mapping (0) | 2024.03.20 |
| [PTAM] Tracking (0) | 2024.03.20 |
| [PTAM] Map (0) | 2024.03.19 |
| [PTAM] PTAM vs. SLAM (0) | 2024.03.18 |


